Spring Boot CRUD with MySql, JPA, Hibernate and Rest API
In this Spring boot CRUD example, you will learn how to develop Spring boot application with REST full web service and Create, Read, Update and Delete data from MySql.
1. Start creating project in Spring Boot
We uses Spring Initializr for creating our application. Go to following link, add artifact and name of your project.
We uses PostMan for test our REST API. Downlaod PostMan from following link :-
In this tutorial, following MySql version used.
- 5.0.27
Add Three dependencies :-
- Spring Web - Build web, including RESTful, applications using Spring MVC. Uses Apache Tomcat as the default embedded container.
- Spring Data JPA - Persist data in SQL stores with Java Persistence API using Spring Data and Hibernate.
- MySql Driver - MySQL JDBC and R2DBC driver.
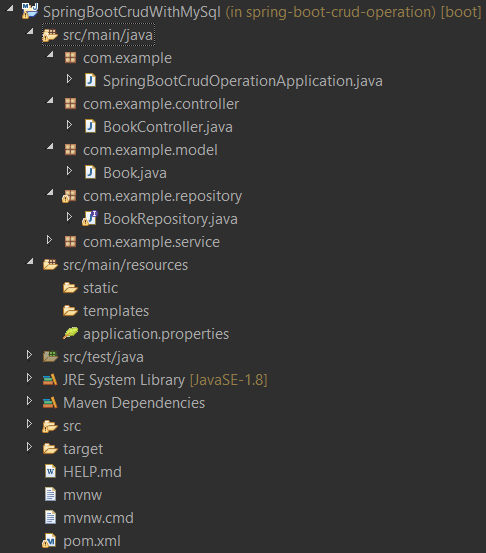
In this tutorial we used following Project Structure.
Check out following image
After all done, click on GENERATE button it will download .zip file. extract that and import in your IDE. we uses Eclipse IDE.
2. Create MySql Schema and Table
CREATE TABLE `book` (
  `id` INT(11) NOT NULL AUTO_INCREMENT,
  `bookname` VARCHAR(30) NOT NULL,
  `author` VARCHAR(30),
  `price` INT NOT NULL,
   PRIMARY KEY (`id`)
);
3. Configure Maven Dependencies
We already includes all maven dependencies. Following the pom.xml file code.
<?xml version="1.0" encoding="UTF-8"?>
<project xmlns="http://maven.apache.org/POM/4.0.0" xmlns:xsi="http://www.w3.org/2001/XMLSchema-instance"
    xsi:schemaLocation="http://maven.apache.org/POM/4.0.0 https://maven.apache.org/xsd/maven-4.0.0.xsd">
    <modelVersion>4.0.0</modelVersion>
    <parent>
        <groupId>org.springframework.boot</groupId>
        <artifactId>spring-boot-starter-parent</artifactId>
        <version>2.4.1</version>
        <relativePath/> <!-- lookup parent from repository -->
    </parent>
    <groupId>com.example</groupId>
    <artifactId>SpringBootCrudWithMySql</artifactId>
    <version>0.0.1-SNAPSHOT</version>
    <name>SpringBootCrudWithMySql</name>
    <description>Demo project for Spring Boot</description>

    <properties>
        <java.version>1.8</java.version>
    </properties>

    <dependencies>
        <dependency>
            <groupId>org.springframework.boot</groupId>
            <artifactId>spring-boot-starter-data-jpa</artifactId>
        </dependency>
        <dependency>
            <groupId>org.springframework.boot</groupId>
            <artifactId>spring-boot-starter-web</artifactId>
        </dependency>

        <dependency>
            <groupId>mysql</groupId>
            <artifactId>mysql-connector-java</artifactId>
            <version>5.1.34</version>
        </dependency>
        <dependency>
            <groupId>org.springframework.boot</groupId>
            <artifactId>spring-boot-starter-test</artifactId>
            <scope>test</scope>
        </dependency>
    </dependencies>

    <build>
        <plugins>
            <plugin>
                <groupId>org.springframework.boot</groupId>
                <artifactId>spring-boot-maven-plugin</artifactId>
            </plugin>
        </plugins>
    </build>

</project>
4. Configure application.properties file
application.properties file located in your project under the src/main/resources folder.
We define our MySql connectivity code here. we added DataSource url, DriverClassName, username and password.
spring.datasource.url = jdbc:mysql://localhost:3306/test?useSSL=false
spring.datasource.driverClassName=com.mysql.jdbc.Driver
spring.datasource.username = root
spring.datasource.password = root

#The SQL dialect makes Hibernate generate better SQL for the chosen database
spring.jpa.properties.hibernate.dialect = org.hibernate.dialect.MySQL5InnoDBDialect

# Hibernate ddl auto (create, create-drop, validate, update)
spring.jpa.hibernate.ddl-auto = update
5. Create Model Class
In this we created POJO (Plain Old Java Object).
Book.java
package com.example.model;
import javax.persistence.Column;
import javax.persistence.Entity;
import javax.persistence.GeneratedValue;
import javax.persistence.GenerationType;
import javax.persistence.Id;
import javax.persistence.Table;

@Entity
@Table(name = "book")
public class Book {

    @Id
    @GeneratedValue(strategy = GenerationType.IDENTITY)
    private int id;

    @Column
    private String bookname;

    @Column
    private String author;

    @Column
    private int price;

    public int getId() {
        return id;
    }

    public void setId(int id) {
        this.id = id;
    }

    public String getBookname()    {
        return bookname;
    }

    public void setBookname(String bookname) {
        this.bookname = bookname;
    }

    public String getAuthor() {
        return author;
    }

    public void setAuthor(String author) {
        this.author = author;
    }

    public int getPrice() {
        return price;
    }

    public void setPrice(int price) {
        this.price = price;
    }
}
6. Create Repository Interface
In this we create Interface for repository that extends CrudRepository.
In example, we extends JpaRepository but we can also extends CrudRepository. if you want to learn more about them and difference between CrudRepository and JpaRepository then check out this :-
BooksRepository.java
package com.example.repository;

import org.springframework.data.repository.CrudRepository;
import com.example.model.Book;

public interface BooksRepository extends JpaRepository<Book, Integer> {

}
7. Create Service class
BookService.java
package com.example.service;

import java.util.List;
import org.springframework.beans.factory.annotation.Autowired;
import org.springframework.stereotype.Service;
import com.example.model.Book;
import com.example.repository.BookRepository;

@Service
public class BookService {

    @Autowired
    BookRepository bookRepository;

    public List<Book> loadAllBooks() {
        return (List<Book>) bookRepository.findAll();
    }

    public Book loadBookById(int id) {
        return bookRepository.findById(id).get();
    }

    public Book saveBook(Book book) {
        bookRepository.save(book);
        return loadBookById(book.getId());
    }

    public void deleteBook(int id) {
        bookRepository.deleteById(id);
    }

    public Book updateBook(Book book) {
        return bookRepository.save(book);
    }

}
8. Create Controller class
BookController.java
package com.example.controller;
import java.util.List;
import org.springframework.beans.factory.annotation.Autowired;
import org.springframework.web.bind.annotation.DeleteMapping;
import org.springframework.web.bind.annotation.GetMapping;
import org.springframework.web.bind.annotation.PathVariable;
import org.springframework.web.bind.annotation.PostMapping;
import org.springframework.web.bind.annotation.PutMapping;
import org.springframework.web.bind.annotation.RequestBody;
import org.springframework.web.bind.annotation.RestController;
import com.example.model.Book;
import com.example.service.BookService;
@RestController
public class BookController {
@Autowired
BookService bookService;// Get All Books
@GetMapping("/books")
private List<Book> getAllBooks() {
return bookService.loadAllBooks();
}// Get book based on given id
@GetMapping("/books/{id}")
private Book getBooks(@PathVariable("id") int id) {
return bookService.loadBookById(id);
}// Save book in DataBase
@PostMapping("/books/save")
private Book saveBook(@RequestBody Book book) {
return bookService.saveBook(book);
}// Update saved data in DataBase
@PutMapping("/books/update")
private Book update(@RequestBody Book book) {
bookService.updateBook(book);
return book;
}// Delete book based on given id
@DeleteMapping("/books/delete/{id}")
private void deleteBook(@PathVariable("id") int id) {
bookService.deleteBook(id);
}
}
There is already one Java Class available when you create project from start.spring.io. In this Application class Main method is already there.
Now time to run our web app.
We can run our application using following ways :-
- Go to Application class and Right click and Run As -> Java Application or Spring Boot App
- Right click on your project Run As -> Java Application or Spring Boot App
So lets see how CRUD operation works. lets start with save
1. Save (Create)
Enter API for save and select POST method from dropdown
http://localhost:8080/books/save
Enter above request body for save there is no need to add id in response, because we define id as primary key. So id is set automatically.
As you can see, after save successfully we get response with id.
2. Update
We change the price of "Clean Code" book from 500 to 200 using update api.
3. Get and Get all (Read)
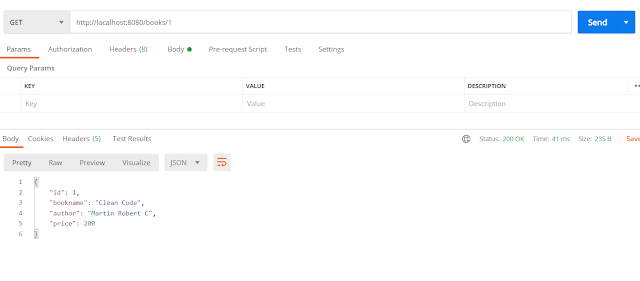
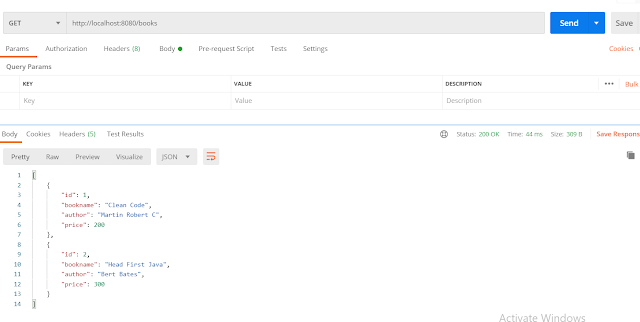
For get one data we have to pass id in our Rest Api. like in above example. and if we does not pass any id then it returns all Books that are present in DataBase.4. delete
As you can see we get status 200 Ok that means out data successfully deleted.
You can download this Project from following GIT repository :-
If you have any query regarding above tutorial then comment down.
Thank You.
In this article we learn how to use Rest Api through Postman. Next we will seen how to perform CRUD operation using UI (User Interface). We will use Thymeleaf template engine for display our data.


Comments
Post a Comment