Spring Boot CRUD example using One-to-Many and Many to One mapping | With Thymeleaf User Interface
In this tutorial, we will learn how to use @OneToMany and @ManyToOne annotation using JPA (Java Persistent API) in Spring Boot. We also attach Thymeleaf for User Interface.
In past tutorial, we already created Spring Boot CRUD with Rest API, JPA and MySql. Please refer that one first, we will continue from there.
For applying One to Many relationship, we need another POJO class. In past we already created Book class, now we will create new class Author.
As we know Author have multiple Books, so we can easily apply One to Many operation. Lets create POJO class for Author and apply @OneToMany on Book.
Define List of Book and apply @OneToMany annotation on field. We are using mappedBy property, so Author table does not create new column.
We already learn about mappedBy property in One-to-One annotation. Please refer that if you want to know more about it.
1. Create Author class
Author.java
import java.util.List;

import javax.persistence.Column;
import javax.persistence.Entity;
import javax.persistence.GeneratedValue;
import javax.persistence.GenerationType;
import javax.persistence.Id;
import javax.persistence.OneToMany;
import javax.persistence.Table;

@Entity
@Table(name = "author")
public class Author {

    @Id
    @GeneratedValue(strategy = GenerationType.IDENTITY)
    private int id;

    @Column
    private String authorName;

    @OneToMany(mappedBy = "author")
    private List<Book> books;

    public int getId() {
        return id;
    }

    public void setId(int id) {
        this.id = id;
    }

    public String getAuthorName() {
        return authorName;
    }

    public void setAuthorName(String authorName) {
        this.authorName = authorName;
    }

    public List<Book> getBooks() {
        return books;
    }

    public void setBooks(List<Book> books) {
        this.books = books;
    }
}
For Bidirectional approach, we also have to apply @ManyToOne annotation in Book class.
Book.java
import javax.persistence.Column;
import javax.persistence.Entity;
import javax.persistence.GeneratedValue;
import javax.persistence.GenerationType;
import javax.persistence.Id;
import javax.persistence.ManyToOne;
import javax.persistence.Table;

@Entity
@Table(name = "book")
public class Book {

    @Id
    @GeneratedValue(strategy = GenerationType.IDENTITY)
    private int id;

    @Column
    private String bookname;

    @Column
    private int price;

    @ManyToOne
    private Author author;

    public int getId() {
        return id;
    }

    public void setId(int id) {
        this.id = id;
    }

    public String getBookname() {
        return bookname;
    }

    public void setBookname(String bookname) {
        this.bookname = bookname;
    }

    public int getPrice() {
        return price;
    }

    public void setPrice(int price) {
        this.price = price;
    }

    public Author getAuthor() {
        return author;
    }

    public void setAuthor(Author author) {
        this.author = author;
    }
}
2. Create Repository Class
import org.springframework.data.jpa.repository.JpaRepository;

import com.example.model.Author;

public interface AuthorRepository extends JpaRepository<Author, Integer>{

}
3. Create Service Class
AuthorService.java
import java.util.List;

import org.springframework.beans.factory.annotation.Autowired;
import org.springframework.stereotype.Service;

import com.example.model.Author;
import com.example.repository.AuthorRepository;

@Service
public class AuthorService {

    @Autowired
    AuthorRepository authorRepo;

    public List<Author> loadAll() {
        return (List<Author>) authorRepo.findAll();
    }

    public Author loadAuthorById(int id) {
        return authorRepo.findById(id).get();
    }

    public Author saveAuthor(Author author) {
        authorRepo.save(author);
        return loadAuthorById(author.getId());
    }

}
4. Create Controller Class
AuthorController.java
import java.util.List;

import org.springframework.beans.factory.annotation.Autowired;
import org.springframework.stereotype.Controller;
import org.springframework.ui.Model;
import org.springframework.web.bind.annotation.GetMapping;
import org.springframework.web.bind.annotation.ModelAttribute;
import org.springframework.web.bind.annotation.PostMapping;
import org.springframework.web.bind.annotation.RequestMapping;

import com.example.model.Author;
import com.example.service.AuthorService;

@Controller
@RequestMapping("/author")
public class AuthorController {

    @Autowired
    AuthorService authorService;

    @GetMapping()
    private String getAllAuthors(Model model) {
        List<Author> list = authorService.loadAll();
        model.addAttribute("allAuthor", list);
        return "index";
    }

    @GetMapping("/new")
    public String addNewAuthor(Model model) {
        Author author = new Author();
        model.addAttribute("author", author);
        return "add-author";
    }

    @PostMapping("/save")
    public String saveAuthor(@ModelAttribute("author") Author book) {
        authorService.saveAuthor(book);
        return "redirect:/books";
    }
}
While saving we need all saved author list, So we also need to add one line of code into book.java "/new" API.
@GetMapping("/new")
 public String showNewBookPage(Model model) {
        Book book = new Book();
        List<Author> authorList = authorService.loadAll();
        model.addAttribute("authorList", authorList);
        model.addAttribute("book", book);
        return "add-book";
 }
For OneToMany and ManyToOne tutorial we need only save functionality so edit and delete are not included for Author class.
Now Lets go to UI part.
5. Add new Author
Include following code into index.html file
<a href="/author/new">
     <button>Add New Author</button>
</a>
After this we will get "Add New Author" button in main page.
6. Save Author Page
add-author.html
<html xmlns:th="http://www.thymeleaf.org">
    <head>
        <title>Add New Author</title>
    </head>
    <body>
        <div align="center">
            <form action="#" th:action="@{/author/save}" th:object="${author}" method="post">

                <table border="0" cellpadding="10">
                    <tr>
                        <td>Author:</td>
                        <td><input type="text" th:field="*{authorName}" /></td>
                    </tr>
                    <tr>
                        <td colspan="2"><button type="submit">Save</button> </td>
                    </tr>
                </table>
            </form>
        </div>
    </body>
</html>
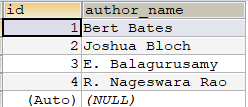
Run Spring Boot application, save some author.
 |
| Author table |
For displaying all saved authors while saving book, we need to change some code "add-book.html".
add-book.html
<html xmlns:th="http://www.thymeleaf.org">
<head>
<title>Add New Book</title>
</head>
<body>
    <div align="center">
        <form action="#" th:action="@{/books/save}" th:object="${book}"
            method="post">

            <table border="0" cellpadding="10">
                <tr>
                    <td>Book Name:</td>
                    <td><input type="text" th:field="*{bookname}" /></td>
                </tr>
                <tr>
                    <td>Author:</td>

                    <td><select th:field="*{author}">
                        <option th:each="author : ${authorList}" th:value="${author.id}"
                                th:text="${author.authorName}"></option>
                    </select></td>
                </tr>
                <tr>
                    <td>Price:</td>
                    <td><input type="text" th:field="*{price}" /></td>
                </tr>
                <tr>
                    <td colspan="2"><button type="submit">Save</button></td>
                </tr>
            </table>
        </form>
    </div>
</body>
</html>
Highlighted code will display all saved author.
- We are displaying all saved authors in drop-down. Here we can select any author and Book table stores foreign key of Author in author_id column
 |
- Saving Book data with Author name.
 | ||
- Book table with Author's table foreign key author_id.
 |
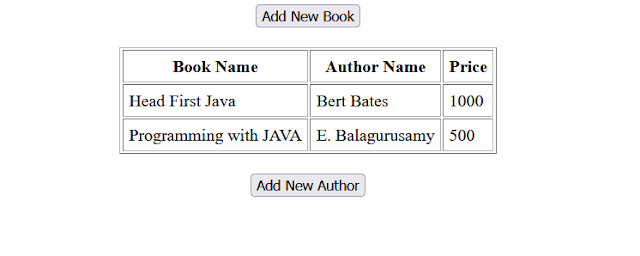
- All saved Book with Author.
 |
Conclusion :
- We learned how to use @OneToMany and @ManyToOne mapping in Spring Boot with using JPA.
- Created POJO, Service and Controller classes and Jpa Repository Interface for reading and writing author data.
- Display all saved authors in drop-down.
- Learned how database tables stores foreign key of another table using one-to-many mapping.
RECOMMENDED TUTORIALS :

Comments
Post a Comment